FileSystemObject also called as FSO, provides an easy object based model to access computer’s file system. You simply have to create an instance of FileSystemObject in VBA and then you can generate files, read files, delete files, iterate though folders and do many other operations on your computer’s file system.
The FileSystemObject is present inside the Microsoft Scripting Runtime Library i.e. Scrrun.dll. This DLL supports the creation and manipulation of files using TextStream object and this is the reason why FSO doesn’t supports operation on binary files.
Uses of File System Object:
FileSystemObject can be used for multiple tasks such as:
- Creating, opening, reading, writing and deleting text files.
- Creating, altering and deleting folders.
- Iterating files and folders.
- Copying and moving files or folders.
- Checking if a location (file path) exists or not.
Accessing FileSystemObject:
The FileSystemObject comprises of several object collections and each of these object collections contain information about a specific aspect of file system. These collections are:
| Object | Description |
|---|
| Drive | This object allows you to get information about a drive attached to your system. For instance it can tell you the space available in a drive, its logical name etc. Note that the drive object that we are referring here doesn’t necessarily means the hard disk, it can be a CD-ROM, Flash drive, RAM or even a logically connected drive via LAN. |
| Folder | This object allows you to create, delete, move or query a folder hierarchy. |
| File | This object allows you to create, delete, move or query a File. |
| TextStream | TextStream object allows you to read or write text files. |
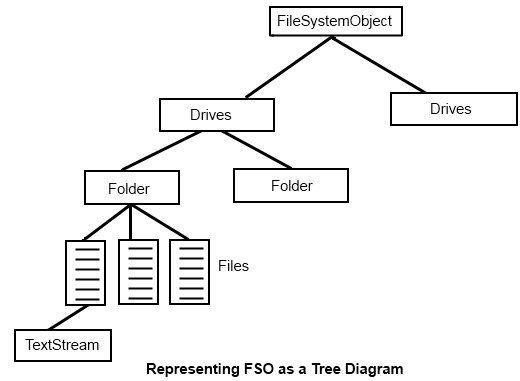
So, diagrammatically a FileSystemObject can be shown as:
Please note that FSO communicates with most of the above objects indirectly. It just directly contains the object collection for “Drives”. Each “Drive” object in the “Drives” collection contains a chain of “Folder” objects. And each “Folder” object contains a “File” collection.
To make it more meaningful, let’s say it this way: A FileSystemObject contains three main methods to fetch (read) specific information about Drives, Folders or Files, these methods are GetDrive, GetFolder andGetFile respectively. Now let’s say you need to find the file size of a particular file, so you will create an instance of the GetFile method and then fetch its size property.
Note: GetDrive, GetFolder and GetFile are not the only methods inside FSO, I have just used them to explain things. In the below section we will see all the methods contained inside FileSystemObject.
FSO Methods:
Below table gives details about various FileObjectSystem methods and the tasks they perform:
| Method | Description |
|---|
| GetDrive, GetFolder and GetFile | These methods are used for fetching information about Drive, Folders and Files respectively. |
| CreateFolder and CreateTextFile | Helps in creating new folders or files. |
| DeleteFile and DeleteFolder | Helps in deleting exiting files or folders. |
| CopyFile and CopyFolder | These methods help in copying files or folders from one location to another. |
| MoveFile and MoveFolder | These methods help in moving files or folders from one location to another. |
Creating a FileSystemObject in VBA:
In this section we will deal with two things:
- Creating a reference of Microsoft Scripting Runtime Library i.e. Scrrun.dll
- Creating an FSO Object.
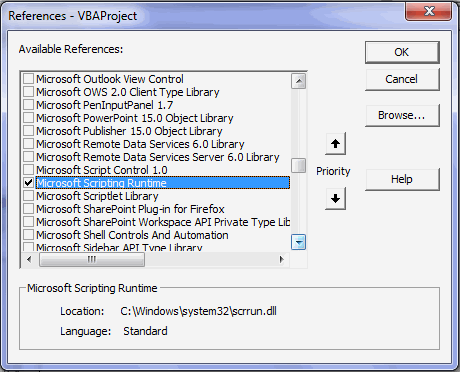
Creating a reference of Microsoft Scripting Runtime Library:
To create a reference of Microsoft Scripting Runtime Library follow the below steps:
- First of all open the VBA editor by pressing “Alt + F11”.
- Next, navigate to “Tools” > “Reference” as shown above.
- This will open a references window. Here select and check the entry “Microsoft Scripting Runtime” and click “OK”.
- Now the reference to Microsoft Scripting Runtime Library has been added.
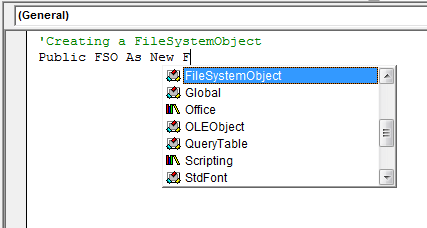
Creating a FSO Object:
Creating a FSO object is simple, follow the below steps to do this:
- In the VBA editor navigate to “Insert” > “Module”.
- Now in the module window type “
Public FSO As New FileSystemObject”.
- This will create an object of FileSystemObject with the name FSO.
After this you can simply access the FileSystemObject’s methods using the FSO object.
6 Practical Examples of accessing FileSystemObject to perform different tasks:
Now let’s move to some practical examples of FSO:
Example 1: Use FSO to find the total free space of a drive.
Below is the code to do this:
-
- Public FSO As New FileSystemObject
- Sub DiskSpace()
- Dim drv As Drive
- Dim Space As Double
- Set drv = FSO.GetDrive("C:")
- Space = drv.FreeSpace
- Space = Space / 1073741824
- Space = WorksheetFunction.Round(Space, 2)
- MsgBox "C: has free space = " & Space & " GB"
- End Sub
Explanation:
In this code first we have created a Drive object using ‘GetDriveFreeSpace’ property to fetch the free space. Finally we have displayed the free space using a message box.
Note that there are two properties to fetch the free space of a drive i.e. drv.FreeSpace anddrv.AvailableSpace.
Example 2: Check if a Folder exists or not. If the folder doesn’t exists then create that folder.
Below is the code:
-
- Public FSO As New FileSystemObject
- Sub ChkFolder()
- Dim Fldr_name As String
- Fldr_name = InputBox("Enter the path of the folder to check :")
- If Len(Fldr_name) > 0 Then
- If FSO.FolderExists(Fldr_name) = True Then
- MsgBox "Folder Exists!"
- Else
- FSO.CreateFolder (Fldr_name)
- MsgBox ("Folder Created!")
- End If
- Else
- MsgBox "Wrong Input"
- End If
- End Sub
Explanation:
In the code we have used an InputBox function to get the path of folder from the user. After this using If statement along with FolderExists method we have checked whether that folder is present or not. If the folder is not present then we create that folder using the CreateFolder method.
Note: CreateFolder method will only create a single folder at a time. So, if you supply an argument “C:\Folder1\Folder2\Folder3” to it then it will only create the Folder3 inside Folder2. But if Folder2 doesn’t exist then it will throw a path not found error.
Example 3: Write a code using FSO to copy a Folder from one location to another.
- Below is the code to accomplish this:
-
- Public FSO As New FileSystemObject
- Sub CopyFolder()
- FSO.CopyFolder "C:\Source-Folder\", "D:\Destination-Folder\", True
- MsgBox "Copying Done!"
- End Sub
Explanation:
In the code we have used the CopyFolder method of FSO, this method accepts three arguments:
- Source Path
- Destination path
- A Boolean argument to specify Overwrite Existing.
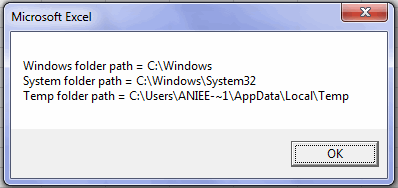
Example 4: Using FileSystemObject fetch the Temp directory, System folder and Windows folder.
To do this we can use the below code:
-
- Public FSO As New FileSystemObject
- Sub GetFolderpath()
- Dim Windows_Fldr As String
- Dim System_Fldr As String
- Dim Temp_Fldr As String
- Windows_Fldr = FSO.GetSpecialFolder(0)
- System_Fldr = FSO.GetSpecialFolder(1)
- Temp_Fldr = FSO.GetSpecialFolder(2)
- MsgBox ("Windows folder path = " & Windows_Fldr & vbNewLine & _
- "System folder path = " & System_Fldr & vbNewLine & _
- "Temp folder path = " & Temp_Fldr)
- End Sub
Explanation:
In the code we have used the GetSpecialFolder method of FSO, this method accepts a single numerical argument i.e. 0-2.
FSO.GetSpecialFolder(0) – Fetches the path of Windows Folder.FSO.GetSpecialFolder(1) – Fetches the path of System Folder.FSO.GetSpecialFolder(2) – Fetches the path of Local Temporary folder.
Example 5: Create a text file, write some content to it, then read the file and finally delete the file.
Below is the code to accomplish this:
-
- Public FSO As New FileSystemObject
- Sub CreateFile()
- Dim txtstr As TextStream
- Dim FileName As String
- Dim FileContent As String
- Dim File As File
- FileName = "C:\TestDirectory\File.txt"
-
- FileContent = InputBox("Enter the File Content")
- If Len(FileContent) > 0 Then
- Set txtstr = FSO.CreateTextFile(FileName, True, True)
- txtstr.Write FileContent
- txtstr.Close
- End If
-
- If FSO.FileExists(FileName) Then
- Set File = FSO.GetFile(FileName)
- Set txtstr = File.OpenAsTextStream(ForReading, TristateUseDefault)
- MsgBox txtstr.ReadAll
- txtstr.Close
-
- File.Delete (True)
- End If
- End Sub
Explanation:
This code first creates a text file, adds content to it, then reads it, displays it using a message box and finally deletes that file.
Example 6: Write a VBA Code that can iterate all the files present inside a folder and also fetches their size and modified date.
Following code can accomplish this task:
-
- Public FSO As New FileSystemObject
- Sub ListFiles()
-
- Dim objFolder As Folder
- Dim objFile As File
- Dim strPath As String
- Dim NextRow As Long
-
- strPath = "C:\Users\Aniee\Desktop\ExcelTrick\ "
-
- Set objFolder = FSO.GetFolder(strPath)
-
- If objFolder.Files.Count = 0 Then
- MsgBox "No files were found...", vbExclamation
- Exit Sub
- End If
-
- Cells(1, "A").Value = "File Name"
- Cells(1, "B").Value = "Size"
- Cells(1, "C").Value = "Modified Date/Time"
-
- NextRow = ActiveSheet.Cells(Rows.Count, "A").End(xlUp).Row + 1
-
- For Each objFile In objFolder.Files
-
- Cells(NextRow, 1).Value = objFile.Name
- Cells(NextRow, 2).Value = objFile.Size
- Cells(NextRow, 3).Value = objFile.DateLastModified
-
- NextRow = NextRow + 1
- Next objFile
- End Sub
Explanation:
In this code we have created a Folder object and then we are iterating all its files using For Each loop. From the file object we are fetching the Name, Size and DateLastModified properties and finally we are writing them to the active worksheet.
So, this was all about FileSystemObject and how to use it in VBA. Do share your comments related to the topic.